Monday, February 25, 2013

pizza.


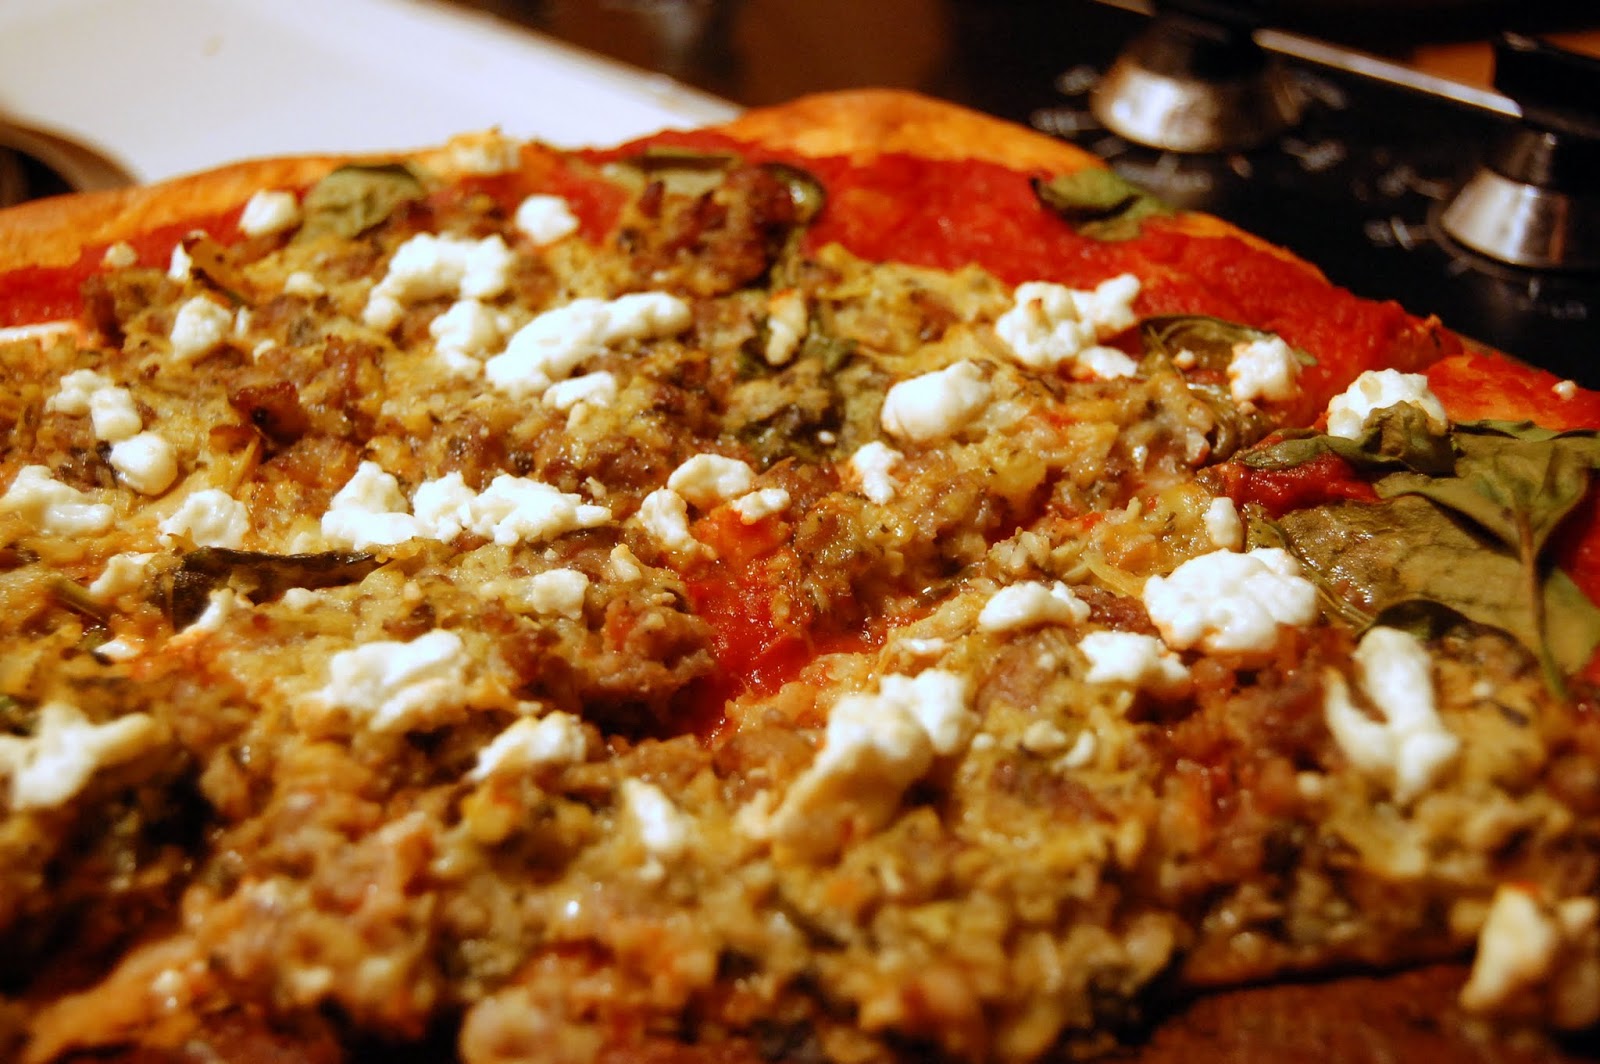
That would be a spinach artichoke sausage goat cheese pizza. What would Mellow Mushroom call that? I have no idea how to make that name any shorter but geez was this good. I discovered a few keys to home pizza making that I think bear repeating, it made the crust on this pizza wonderfully crisp:
  • Crank the oven up to at least 450, 500 is probably better but I just wasn't sure my rickety oven could handle that.
  • Put your cold pizza stone on the bottom rack of the cold oven before you preheat it so that they both heat up together.  
I believe these two steps together produced a nice crisp crust which I've found is pretty hard to achieve. I blame my lack of a wood-burning oven. For an extensive look at baking pizza at home, the folks at Slice have written miles on the subject and it's an excellent resource for the home cook. I plan to work my way through the recipes whenever I have the forethought to make my own pizza dough instead of buying the dough balls from Harris Teeter.

Here's a loose recipe for Sunday night's version, adapted from this lovely tome:

  1. If you're making your own dough from scratch, it should have completed its second rising and be ready to use before you start preheating the oven. If you don't happen to have three hours to kill, take your dough (I go with the dough balls they sell in the deli section because to me it's the best combination of taste and convenience) out of the refrigerator and let it warm up a little.
  2. Position your oven rack to the lowest setting, making sure to allow room to maneuver the pizza in and out of the oven later.
  3. Place your pizza stone (if you have one) in the oven and preheat the oven to 450. 
  4. While your oven is preheating, saute 1/2 lb. of sweet italian sausage until thoroughly cooked. Add 2 cloves fresh garlic, minced and saute until fragrant, 30 seconds or so.
  5. Drain and rinse 1 can of artichoke hearts. Puree in a hand blender or chop finely with 2 tablespoons of fresh basil. Mix together with the cooked sausage and set aside until ready to top your pie.
  6. I have a pizza stone but no pizza peel, so I waited until my oven had preheated and then placed the preheated stone on my stovetop while I stretched the dough out by hand and plopped it directly onto the stone.
    1. To stretch out by hand I hold the dough ball close to one edge perpendicular to the floor, using the thumb of both hands to pinch and form the outer crust, and turn it around and around, letting gravity naturally stretch the dough out.  This is much easier to me than using a rolling pin since you can make the dough do what you want it to but it's also easy to cause tears; it's really up to you. If you do decide to use a rolling pin make sure your dough is room temperature or it will be frustrating!
  7. I like to use simple sauces for a base, like crushed tomatoes drizzled with olive oil and basil or plain olive oil and basil or marinara sauce. Just make sure to add a little seasoning if you're using something like plain crushed tomatoes or, at least to me, the finished dish will taste a little tomato-y. For this recipe I used 14 ounces crushed tomatoes (and I didn't season it but I should have. Now we all know better :) )
  8. Cover the surface of the pie with a few handfuls fresh baby spinach, just so the pie is covered in a thin layer.
  9. Dollop the sausage mixture in rounded tablespoonfuls all over the surface of the pizza dough. The topping mixture isn't very spreadable so it's best do dollop it in small amounts and closely together so you don't have to do too much spreading.
  10. Crumble 2-4 ounces (depending on your taste) fresh goat cheese over the surface. (Now would be a good time to add sundried tomatoes; I did not but hey, it's your pizza.)
  11. Bake in the preheated oven for 15 minutes, until the crust is evenly brown and lovely.
  12. Let cool for at least 5 minutes before slicing up.  
Glory.
Glory.

Hallelujah.

Enjoy pizza night! Break out the pinot noir if you've got it; this guy would really appreciate it.

Sunday, February 24, 2013

breakfast.

Chili Con Carne, Enchiladas, Salsa, Egg

That would be black bean enchiladas, topped with chili con carne, topped with a fried egg over easy, topped with salsa. For breakfast. Man, typing that made me hungry and also made me think I should have put sour cream on top as well. All straight out of the fridge, just cleaning up the dinner leftovers from the week and it took about 5 minutes to put together. With a good strong cup of coffee of course. It doesn't make sense in my head but I know from experience that nothing tastes better to me with southwestern lumberjack-type breakfasts like huevos rancheros or whatever you want to call that up there than coffee.


Lord knows I don't eat breakfast like this every day, nor would I want to, but for some reason I am always starving when I wake up on Saturday mornings. I had a roommate in college that always ate her takeout leftovers for breakfast: Lamb Rogan Josh, General Tso's Chicken, cold mozzarella sticks, didn't matter. It seemed so odd to me at the time but I think she has the right idea: before cereal and muffins and the like took center stage, people probably ate leftovers for breakfast quite often.That's a good question, actually. We never see them eating breakfast on Downtown Abbey but I know the must have. Perhaps that's for another post.

What about you? Are you a breakfast eater? Savory or sweet? Lumberjack breakfast or muffin and a yogurt?


Wednesday, February 20, 2013

On Meal Planning

How do you usually make it through the week? Food-wise, that is.  Do you skip breakfast, eat a can of soup for lunch and, exhausted yet ravenous when you get home, have a beer and chips and guac and call it dinner? Because that's exactly what I did my first few years out of college, which is strange when I consider that for the first 22 years of my life I was a three-squares-a-day kind of girl. Then people stopped making food for me and something about figuring out how to work 40+ hours a week and fit in all those things you find personally fulfilling at the same time, like baking (which is another dinner option) and reading and working out, my meals were the thing to go. 

When I got married I discovered that my husband grew up in a household where each night's meals were affixed to the side of the fridge schedule-style, conveniently communicating each night's dinner. The boy also gets hungry, a lot hungrier than I am for dinner so chips and salsa were not gonna cut it. So I started meal planning for the first time in my life. And I love it.


I hear that you can save money by meal planning but I think that's for people who have much more restraint than I when grocery shopping. So far I haven't mastered the concept of buying what's on the list and only on the list. But hey, I would never buy cereal or frozen waffles if I did. I tend to meal plan on a quiet evening while watching Netflix. I love reading food blogs and recipes online, but for some reason I'm very attached to my cookbooks and cooking out of those is much more enjoyable than saving recipes online. Sometimes I don't get much accomplished or nothing sounds good or I end up planning beef every night for dinner and only realize it after the fact, but sitting down and thinking about what's in the fridge and what we'd like to eat next week just helps. It's also nice to come home from work and not have to think about what to make but just have to make it. We ended up eating a lot of meat last week so I went vegetarian with this week's plan:

Monday

Smoky Black Bean Enchiladas

Tuesday

Veggie Burgers

Wednesday

Potato and Chickpea Stew

Thursday

Green Lentils and Spinach w/ Hard Boiled Eggs on Toast

As you'll notice I don't tend to plan side dishes, etc. and I usually only plan 3 or 4 nights a week to leave some flexibility for leftovers or simple meals like spaghetti if I feel like it. Also, the days don't really mean anything to me that's just how my current meal planning template is organized. For instance, so far this week we've had the Green Lentils and Spinach (really, really good) and the Smoky Black Bean Enchiladas (also very good) and I think tonight I'm going to make spaghetti. I'll probably also buy some good bread to go with the stew and some salad to go with the veggie burgers, and we try to always have frozen veggies in the freezer and some quick-cooking grains in the pantry to fill in meals as needed. I will echo the general advice of meal planning, shopping, and cooking on three different days so as to not go crazy. 


For several weeks in a row I did a big cooking day on Sunday and filled our fridge with casseroles. As lovely as it was to know I only had to warm a nice meal up every night, there's only so many types of dishes you can make ahead, casserole and stew-type things, and I try not to spend my Sunday afternoon cooking if it feels like a chore and I'd rather take a walk. So now I leave a little more flexibility in my schedule and my menu for the week.  What works for you? How do you keep costs low and taste and nutrition high for weeknight meals, if those are some of your goals?

Happy Wednesday!

Wednesday, February 13, 2013

A word on coffee


 I used to drink my coffee black 100% of the time, in the mornings before I left for school. The Christmas I was 15 my mother received an assortment of vacuum-sealed sample sized coffees in a gift exchange at work. We had an old drip coffeemaker at home but Lord knows when we had used it last. Nevertheless my dad made us coffee on Christmas morning (none for my mother) and so it began. Much has been written about ideal coffee brewing temperatures, methods, beans, and roasts and while I enjoy such discussions and the pursuit of coffee perfection, most days a girl just wants a good cup of coffee in her favorite mug with a touch of creamer, no sugar (that's to leave room for the morning cookie. Nothing tastes better with unsweetened coffee than a little sugar).

I have always felt that a person's coffee preference says something, if not about her character, than certainly about her personality.  A black coffee drinker can be friends with a nonfat mocha latte drinker, but there are some obvious differences there. Of course we all have our moments--I went through a nonfat sugar free cinnamon dolce latte phase before the introduction of the "skinny" order; but really, who wants to be the girl ordering a skinny vanilla latte? And forget about a dude ordering a skinny drink in the middle of the morning rush.  Congratulations to all of you secure enough to say that out loud in front of a line of strangers but whenever I do I feel the need to explain my order to the barista and/or the person behind me: "Something about the 2% milk is just too heavy for me.""I drink diet soda so I don't even notice the artificial sweetener." What I really want to say is: just because my drink is skinny doesn't mean I need to be, society and all you corporate marketing execs who decided to name my morning indulgence "skinny" so I'll feel a little less guilty for spending $4.50 on it. Hey, at least I earned a star for my purchase. 25 years old and still extremely motivated by virtual stickers. Now my standard order when I'm out is a soy misto with one pump of [syrup of choice]. No matter how slowly I say it I have to repeat myself at least once and, yes, I do feel like a diva when I order.

College was my french press phase, mostly because the coffee in the dining hall was pretty undrinkable hotel-coffee variety and my thrift store drip coffee maker just made me sad. No use putting expensive coffee in that thing.  Then I got married and one of the wonderful things about getting married is that you get a lot of presents, like the coffeemaker of my dreams from one of my bridesmaids.


It's the only coffeemaker I've found with a conical burr grinder (as opposed to a blade grinder, like those handheld versions that double as spice grinders), which preserves more of the beans' oils and hence their flavor. It also brews the coffee at the optimal temperature and time to extract just the right amount of flavor from the beans. Or at least that's what Amazon tells me and I am happy to believe the marketing in this case. It's a whole lot easier to clean than my french press and when I really have my act together I can program it to start the night before and wake up to the smell of coffee.

How do you take your morning coffee?

Friday, December 21, 2012

Spiced Cranberry Eggnog Scones

Cubed butter on baking counter
Saturday mornings are meant for baking, especially if you're the type who naturally wakes up an hour before everyone else. I have always been 100% a morning person; once my eyes pop open there's nothing for it, I'm not going back to sleep. It's always worked out particularly well; everyone's usually waking up right when the baked goods come out of the oven.

Such can be the case with these pretty darn delicious Cranberry Eggnog Scones.  Don't know how you get much more Christmas-y than that. These could easily be prepped the night before Christmas morning as well; I would meaure all your dry ingredients into a bowl and cut the butter in, then cover that and wait to add the wet ingredients the following morning. It actually might turn out better scones because the extra-cold butter and flour will make for extra-light and fluffy scones once the butter hits the oven (the steam is what makes biscuits and scones fluffy and almost moist on the inside!)


I made these in the food processor, which is a great way to make scones, but if you have a little baby guy like mine it would be best to just make these by hands.  When you add the wet ingredients you only want to pulse for 2 or 3 pulses and my little guy was just too small to mix all the ingredients in such a short amount of time.  I actually inherited this 20-year old food processor that my mom used to make homemade pizza dough when we went home for Thanksgiving and I. love. it.  It makes Sunday cooking day a breeze and saves my eyes from watering while I'm chopping onions.

But back to these scones: They are moist and fluffy and wonderful, even with my over-processing, thanks to the low protein in the cake flour. I would definitely make these again, in the mixer or by hand, and they would turn out even better. These scones definitely call for jam; the fresh cranberries are wonderfully tart and the scones themselves barely sweet. Enjoy!

Spiced Cranberry Eggnog Scones 
adapted from The Complete Baking Cookbook by George Geary

  • 1 1/2 cups all-purpose flour
  • 1 1/2 cups cake flour
  • 3 T granulated sugar
  • 1 T baking powder
  • 1 tsp. salt
  • 1 tsp. cinnamon
  • 1/2 tsp. nutmeg
  • 6 T. cold unsalted butter, cut into small dice
  • 2 eggs, beaten, divided
  • 3/4 cup eggnog
  • 1/2 cup fresh or frozen cranberries (do not thaw first if frozen)
  1. Preheat oven to 425.
  2. In a large bowl, combine the dry ingredients, mixing well.
    1. If mixing in a food processor, add the dry ingredients to the bowl and pulse several times to combine.
  3. Cut in the butter with a fork, a pastry blender, or your hands (if mixing by hand I usually stick the dry ingredients in the freezer for 5 minutes or so after cutting in the fat to make up for the warmth of my hands)
    1. If using a food processor, scatter the butter pieces evenly over the flour and pulse several times to combine. You don't want to pulse too much or the butter pieces will be too fine and your scones will not be as tender.
  4. Set aside 1 T. of beaten egg (you can just put it in a 1/4 cup measuring cup or something until you're ready.) Whisk together the remaining egg and eggnog and add to the dry ingredients, stirring until almost combined (you will finish combining them in the next step and you don't want to overmix). 
    1. If mixing in the food processor, beat the wet ingredients together in a small bowl and pour down the food processor chute, pulsing once or twice to combine.  Transfer to a large bowl and continue.
  5. Add the cranberries, stirring just to combine.
  6. The scones you see in the picture I made as drop scones: I just scooped the dough out with a muffin scoop and flattened the top slightly.  If you prefer, you can pat the dough into a 10-inch circle, place on your baking sheet and cut into 12 wedges with a bench scraper or pizza cutter (do not separate the wedges after cutting.) Brush with the remaining beaten egg, using a pastry brush if you have it or a fork if you don't.  Sprinkle with some raw sugar if you have it for beauty and crunch. 
Shaped scones brushed with beaten egg (would be great sprinkled with a little turbinado sugar!)

7. Bake in the preheated oven until puffed, light brown and gorgeous, 18 to 22 minutes.  Serve warm with eggnog coffee (have you ever used eggnog as coffee creamer? It's a good idea).
  
Fresh out of the oven.

Merry Christmas, Everyone!

Sunday, December 2, 2012

Tis' the Season for Cookies: Or, the Importance of Butter

I'm pretty sure "The Importance of Butter" could just be the subtitle of every post, but in this case I'm referring to that little modicum none of us pay much attention to in ingredient lists: 3 sticks of butter, softened. While I am all for throwing things together in the kitchen, I definitely hold strong opinions about the proper temperature of butter in a recipe, or beside my bread at a nice restaurant for that matter. I know the kitchen is 80 degrees, why in the world would you give me a hockey puck of butter to spread on my it-had-better-be-warm roll? I feel the need to justify myself here: I won't actually send the bread and/or butter back, not at this point in my life anyway, but a restaurant that serves both warm bread and soft butter without question before my order comes is well on its way to earning repeat-visit status on my list before my entree arrives. A woman's got to have her principles. But let's focus on the butter, shall we?


Real life: Who actually bakes with room temperature butter? I don't know anyone with the forethought or patience to take butter out of the fridge an hour or two before baking, myself included. The problem being no one who gives two hoots about their stand mixer would make it try to turn a stick of rock-hard butter into a fluffy mass of goodness either, leaving the obvious solution of throwing that stick of butter into the microwave for a few seconds.  The problem with this is that you often end up with the concave-stick of butter thing going on when the middle of the butter begins to melt, thus changing the butter from a solid to a liquid (I know, duh) and inhibiting its ability to trap air, ultimately drastically changing the texture of your finished cake or cookie.

This particular baking mishap can be avoided by utilizing the Ben Affleck of microwave buttons (forgotten, but not gone): the power button. In my house we always reheated out leftovers on 80, our hot chocolate or coffee on 70, and only used 100% power when we actually wanted to cook something like frozen vegetables.  I'm just hazarding a guess that this is probably because my father read the manual of the first microwave they bought back in the 80s cover-to-cover and has been following their suggestions for the last 25 years. We're a family of instruction-followers, I'll admit it.

Microwave at low power


I usually microwave my butter at 20 or 30% power for a full 55 seconds, and after all that microwaving it still is only slightly softened, just at room temperature:

Yup, just throw the sticks in their still in their wrappers, straight from the fridge.


This technique also works great for cakes, which in my experience rise much better when all of the ingredients (butter, milk, eggs, etc.) are at room temperature, an experiment which can be addressed in other posts.

Now, on to the cookies! Does anyone else's family make Spritz cookies at Christmas? I am the proud inheritor of my family's 20+ year old cookie press and it still works like a champ.  I've never used the gun-style cookie presses they sell at craft stores now but I would be hard pressed to trade anything for my all-metal version. 

Because my mother tends to take much better care of her possessions than I do (note the original packaging) I imagine this cookie press will last another twenty years or so, until the next culinarily-inclined offspring inherits it.

Is there anything better than Christmas cookies and not-just-coffee-in-that-mug? I don't care if it's 65 outside, I'm going to pretend like it's Connecticut and I'm justified in warming myself up a little this afternoon. 


'Tis the Season: Spritz Cookies
p. 684 of The Gourmet Cookbook
Just go ahead and get yourself a copy if you don't have one already and thank me after your next dinner party. And Amazon definitely has no idea who I am and doesn't care whether or not you buy a copy by clicking on the link :)  Jus' sayin'.

  • 3 1/2 cups all-purpose flour
  • 1/2 tsp. baking powder
  • Rounded 1/2 tsp. salt
  • 3 sticks unsalted butter, softened 
  • 1 cup sugar
  • 1 1/2 tsp. vanilla extract
  • 1/2 tsp. almond extract
  • 1 large egg, lightly beaten
  1. Put a rack in middle of oven and preheat oven to 350.
  2. Sift together flour, baking powder, and salt.
  3. Beat together butter, sugar, and extracts in a large bowl with an electric mixer at medium-high speed until pale and fluffy, about 3 minutes. Add egg and beat well.  Add flour mixture and mix at low speed until just combined.
  4. Quarter dough. Put 1 piece into cookie press and, holding press slightly above an ungreased baking sheet, squeeze out dough to form cookies (follow manufacturer's instructions), spacing them about 3 inches apart. Form more cookies on additional baking sheets with remaining dough in same manner.
  5. Bake cookies in batches until edges are golden, 10 to 15 minutes per batch. Transfer to racks to cool.
 These are so easy to dress up for Christmas by coloring the portions of dough red and green and/or sprinkling with colored sugar, sprinkles, etc.
 

Sunday, October 28, 2012

Multigrain Chock ful o' Apple Muffins


My philosophy on clearance, sale, etc. items is twofold. First of all, the bigger the discount the more likely I am to buy, regardless of how much money I am actually spending. This makes me particularly susceptible to marketing ploys of all kinds as I am much more likely to buy something if I at least believe that I am getting it for 50% off or more, regardless of whether I'm spending $20 or $200. This renders me particularly powerless when it comes to clearance racks and those lovely little end caps at the grocery store with dented cans of pork and beans for $0.50. Everything happens for a reason. While I usually have the power to resist a gallon of milk that expires today (wait no I've bought that before...but it was organic milk for $1!) or 3 pounds of steak marked down 10% I have less willpower when it comes to fresh produce at a discount. What this often means is that my husband and I are often stuck with those bags of bruised apples and bananas that get mushier the longer you look at them. I can't help it when they're only $1 and hey, you can never have too much banana bread. Except for when you do. 


Last week's batch of mushy bananas turned into a frighteningly moist and delicious banana sour cream pound cake, a rather decadent step up from the usual and highly recommended with more ice cream and caramel on top. Butter and full fat dairy are indeed magical ingredients but it turns out it is actually possible to ingest too much of each, meaning that by the time I turned to my bag of bruised apples I was actually in the mood for something a little more nourishing. Perhaps more fiber grams than fat grams? It would be nice to not need an afternoon nap after my afternoon snack, at least today. I ended up with scrumptious little morsels that were equal parts apple and muffin, an apple cobbler in a muffin tin relying on the sweetness of the apples themselves and the heartiness of the oats for flavor. I can't wait to tinker with this recipe in the future. The recipe called for grinding the oats with the flour and I would love to leave them whole next time, maybe soak them in a little buttermilk first and try a bit of cornmeal for some texture and crunch.

Two thoughts: This is one of my favorite kitchen utensils and especially handy for dishing out muffin batter. Thought two: I seriously need a serious camera. Right now the s95 is my top pick for a good entry level point and shoot. Thoughts?


Just bursting with appley raisiny goodness.
These make a particularly homey and nourishing afternoon snack with a dollop of apple butter and even a smear of almond butter. Enjoy!


Multigrain Chock ful o' Apple Muffins

adapted  from Real Simple Whole Grain Blueberry Muffins

  • 1 1/4 cups whole wheat flour
  • 1 cup old fashioned rolled oats
  • 1/4 wheat bran (not bran flakes; if you don't have any may substitute 1/4 cup flax meal or an additional 1/4 cup of flour, each of these will give the muffins a different texture but all will work!)
  • 1 teaspoon baking powder
  • 1 teaspoon baking soda
  • 1/2 teaspoon salt
  • 1/2 cup Greek yogurt + 1/2 cup kefir (I used the combo of these two because that's what I had on hand; 1 cup sour cream, plain yogurt, or buttermilk would all do just fine)
  • 1/4 cup light brown sugar (if you like things sweeter up the sugar to 1/3 or 1/2 cup)
  • 1 egg
  • 1 teaspoon vanilla
  • 2 very large or 3 regular apples, chopped
  • 3/4 cup raisins

1. Heat oven to 375. Grease a standard 12 cup muffin tin and set aside.
2. Combing the flour and wheat bran in a large mixing bowl. I had two kinds of whole wheat flour on hand, one from the grocery store and one from the farmer's market.

2. Add the oatmeal, baking soda, baking powder, and salt and whisk to blend
3.  Using a food processor (or immersion blender if you still don't have a food processor *sigh*) pulse the dry ingredients together until the oats are processed into a flour. I left my oats a little chunky because I wanted some texture in there.


4. In a separate bowl, whisk together the dairy, egg, sugar, egg, and vanilla.
5. Combine the wet ingredients with the dry ingredients, folding until just combined. Fold in the apples and raisins. (batter will be very chunky!)
6. Divide batter evenly among the muffin cups (batter will be rounded but that's ok because the apples cook down as the muffins rise.

7. Bake at 375 for 22 to 25 minutes, until nicely browned and crusty.
Have you ever actually watched things baking in the oven? It's so much fun to watch them rise before your eyes!


Enjoy! Preferably with a mug of tea.